JBL GTO220 Loudpeaker Installation
in the Mitsubishi 3000GT/Dodge Stealth
Introduction
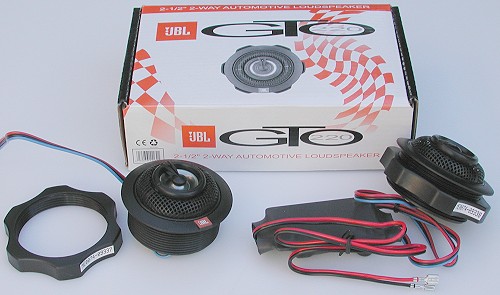
These tips show how I installed JBL GTO220 2-1/2" 2-way automotive loudspeakers in the dash of my 1992 Dodge Stealth Twin Turbo. The GTO220 is not listed at JBL's web site and so may no longer be manufactured (November 2003). These mid-range/tweeter combination speakers are still available from a variety of stores. I purchased my set from DiscountJungle.net for $51.90 for the pair.After installing the passenger's side dash speaker, I compared the sound to the driver's side factory dash speaker using the balance and fade controls on the factory head unit. The factory speaker sounds muddled compared to the GTO220. The GTO220 is much brighter and clearer. The GTO220 also produces much greater "depth" of sound. I have Infinity Kappa 63.1i and 693.1i speakers installed in the doors and rear compartment, respectively. The head unit and wiring are all factory. The lower resistance of the GTO220 compared to the factory dash speaker, 4 ohms compared to 8 ohms, does increase the loudness a bit over the the factory setup, requiring the fade control to be adjusted for more rear speaker bias.
| JBL GTO220 Loudspeaker | |
|---|---|
| Type | 2.5" 2-Way |
| Impedance | 4 ohms |
| Power Handling | 5W - 75W rms |
| Sensitivity | 89 dB |
| Frequency Response | 300 Hz - 21.5 kHz |
| Mounting Depth | 1-3/4" |
Installation
The method described below is derived from what other owners have reported using. The factory dash speaker is removed from the dash and from the ABS plastic frame that holds it and the wiring harness connector. The GTO220 speaker is mounted in the ABS frame that held the factory speaker. The factory wiring harness and connector are re-used. From threads on the www.3si.org message board I see that some of the newer models do not place the dash speakers in these plastic frames. If that is the case for your car, search the 3si "Audio Modifications" forum for posts by "golfpro". He presents a nice solution using trim rings.The recommended tools include: small slotted screwdriver, #2 Phillips screwdriver, small pocket knife or similar tool, wire cutter and stripper tool, soldering iron and solder, ABS cement (look in the plumbing supply section of your favorite hardware store), toothpics (use to spread the cement), a clamp that can open to about 2" or more. Please read all of these instructions before performing this procedure.
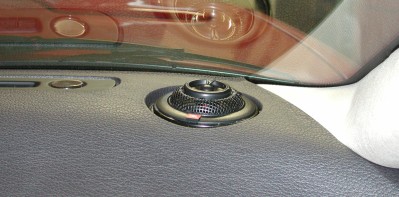
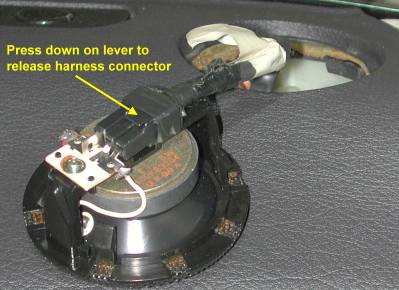
1. Remove factory speakers from the dash. The factory speakers are mounted in an ABS plastic frame that just snaps into the dash. On the passenger's side (shown below) I was able to loosen and lift the speaker out by hand. On the driver's side I had to use a small slotted screwdriver to get the speaker loose. Just gently pry at the edge and it should pop up. I then finished removing the speaker by hand. Press down on the release lever and pull the wiring harness free from the wiring connector attached to the frame.
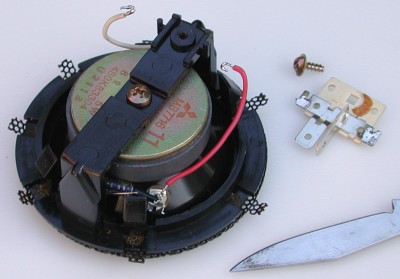
2. Remove the factory speaker from its plastic frame. First, "unsolder" the wires from the terminals on the speaker. Touch the soldering iron to the solder near where the wire is attached to the terminal. With your other hand gently push the wire way from the notch in the terminal bracket. Note the wires are bent in a "U" shape. If you do not have a soldering iron, you will have to cut the wires. Leave yourself enough length of wire that you can strip some insulation back and use a butt splice or other insulated crimp terminal to connect to the GTO220 wires.

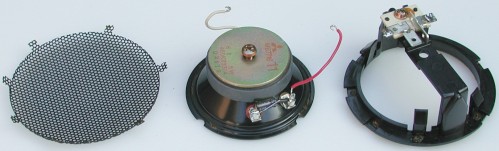
Second, use a #2 Phillips screwdriver to remove the screw that attaches the terminal bracket to the ABS frame. Save the screw and the removed bracket; they will be re-used. Note the two posts that align the bracket on the plastic frame. Third, use a pocket knife or similar tool to gently pry out the seven tangs that hold the mesh cover to the plastic frame. Pry gently "from the side" to avoid damaging the frame. However, if you do break the frame or a part of it, ABS cement can be used to make a repair.
3. Mount the GTO220 in the factory speaker frame. Remove the large rotating ring from the GTO220 speaker. Now look at the factory plastic frame and note the wide pieces that support the cross frame. These two supports must align with the two notches in the dash opening. The notches are aligned with the length of the dash, that is, when the the frame is inserted in the dash the plastic frame's smaller cross frame will be pointed toward the sides of the car. Go ahead and place the frame in the dash so you see what I mean. The reason for noting this is so that you can align the GTO220 in the plastic frame in a particular orientation. I am not sure these tweeters are direction firing. But if they are, they probably fire toward the JBL logo on the rim of the speaker. I thought this logo should point either toward the passenger (straight "back") or toward the center of the car. I decided to point the logo at a 45º angle (between the driver and passenger).
Slide the wires and crossover "block" through the frame so that the GTO220 can sit solidly on the upper ring of the frame. It is like this speaker was made to be a replacement for the factory speaker! Be sure you are happy with the positioning of the speaker and its wires. Now cut off the quick disconnect female terminals leaving maybe 2" of wires so that these connectors could possibly be used on another project in the future. Strip off about 1/4" of insulation. Twist the strands and bend them into a "U" shape. Tin the wires (heat the wires with a soldering iron so that solder can flow between and coat the strands). If you are not soldering these connections then attach the speaker wires to the wires you left connected to the original speaker terminal bracket. Twisting the wires together and taping would be the simplest solution. Using insulated crimp terminals will work. I would advise against using wire nuts. The best solution here really is soldering the tinned GTO220 wires onto the original terminal bracket.
The factory terminal bracket has "-" and "+" molded into it. The upper bar of the "T" that the two terminals resemble is the positive post. The larger GTO220 connector, which is also the red wire, is the positive (+) wire. The black wire is the negative (ground) wire.
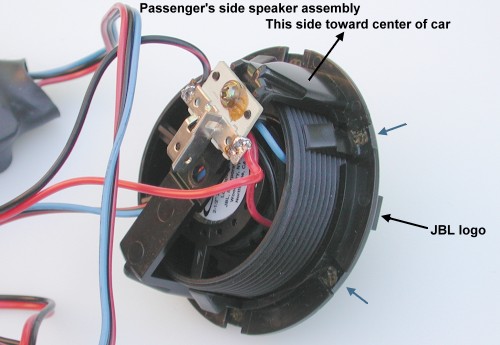
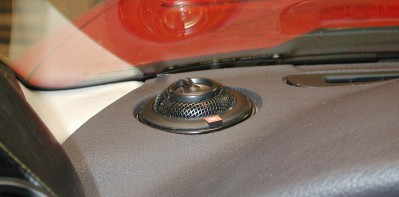
Before gluing the speaker into the plastic frame you may want to do a test install of the assmebly in the dash. There is enough space toward the front of the opening for the crossover block and extra wire to go into. I place the side of the frame with terminal on it toward the center of the car. Be sure you know how you want to position the speaker and then remove the assembly. Slide the speaker out of the frame and apply ABS cement in to the underside of the rim of the speaker, either continuously or in discreet patches. Do not apply too much; just a thin layer will do. Carefully insert the speaker back into the plastic frame in the exact position you want it to be. Try not to move the speaker too much or the cement may smear. Clamp the speaker to the frame as shown below. You have a few minutes that you can move the speaker if you need to center it. After about 30 minutes of clamping, the speaker will be "welded" to the frame. It will take about 12 to 24 hours for a full cure. The pictures above and below show the passenger's side speaker assembly. You will want to "reverse" the symmetry for the driver's side.

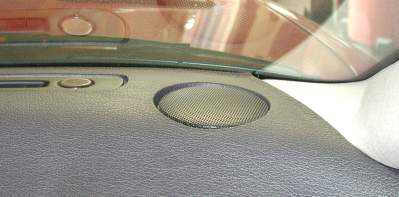
4. Install the speaker assembly in the dash. Slide the wires and crossover block into the space at the edge of and below the speaker well. Connect the wiring harness to the assembly wiring terminals; you will hear/feel it "click" into place. If your car is like mine, you will find trying to insert the assembly is a very tight fit. I had to apply firm pressure to flex the cross bar on the plastic frame and the dash a little for the assembly to squeeze under the windshield. After the assembly is in the well, align the frame so that it will insert properly in the dash. Press down until the assembly "snaps" into place.